
You want shoes that fit right and feel good all day. Measure your feet at home with a pencil, paper, and a ruler to get an accurate length and width, then match those numbers to a reliable size chart for the brand you plan to buy. Accurate foot measurements and checking each brand’s size chart are the fastest ways to avoid poor fit and discomfort.
This guide walks you through simple steps, shows how to convert sizes between systems, and gives tips for wide or narrow feet so you can pick shoes that match your foot shape and activity. Follow the clear instructions here and you’ll spend less time guessing and more time walking comfortably.
Key Takeaways
- Measure your foot length and width at home for the best starting point.
- Use the brand’s size chart and conversion info to pick the right size.
- Consider foot shape and activity when choosing the final fit.
Understanding Shoe Sizing
You will learn how different size systems work, why men’s, women’s, and kids’ sizes differ, and why width matters for comfort and foot health.
Global Shoe Size Standards
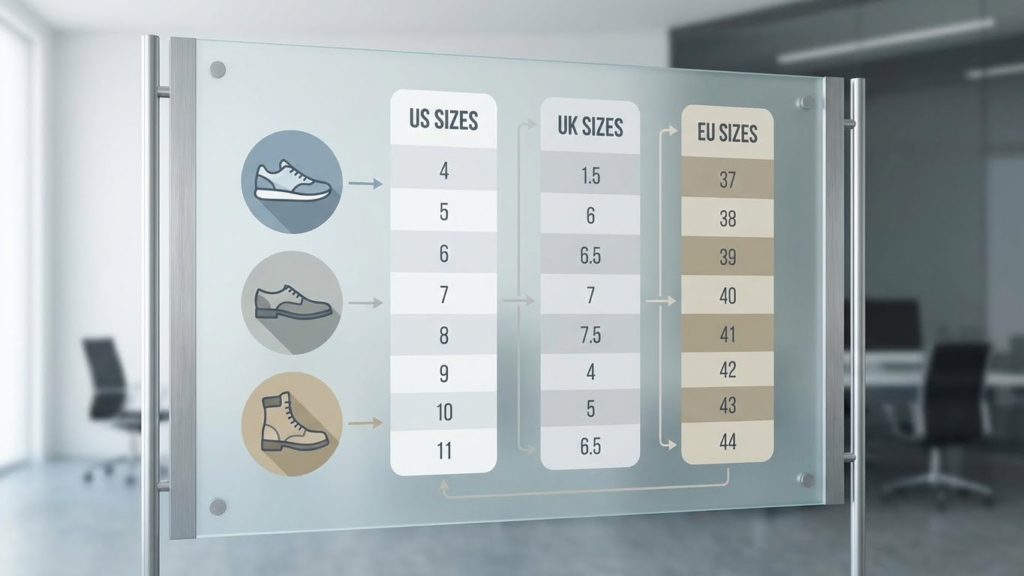
Shoe sizes use regional systems: US, UK, and EU are the most common. Each system measures length differently. The US and UK use numbered scales that increment roughly every 1/3 inch. EU sizes use a single continuous scale based on the last length in centimeters.
When you convert sizes, expect small variations between brands. For example, a US men’s 9 often equals a UK 8 and an EU 42–43, but some brands add or subtract a half size. Use the brand’s size chart and measure your foot in centimeters to match the closest listed size. If unsure, pick the larger size or try shoes on later in the day when feet are slightly swollen.
Differences Between Men’s, Women’s, and Children’s Sizes
Men’s and women’s sizes use separate numbering in many regions. In the US, women’s sizes are usually about 1.5 to 2 sizes higher than men’s for the same foot length. For example, a US men’s 8 roughly equals a US women’s 9.5–10. Children’s sizes start small and often transition to youth or junior sizes before adult charts.
Sole shape and last width also differ by gender. Women’s shoes often have narrower heels and toes. Children’s sizing accounts for growth, so allow extra room—about a thumb’s width (10–12 mm) from the longest toe to the shoe tip. Always measure each foot; many people have one foot larger than the other and should fit shoes to the larger foot.
Shoe Widths and Their Importance
Width affects comfort as much as length. Width labels (B, D, E, etc.) vary by country: in the US, women’s standard width is B and men’s is D. Wider labels like EE or EEE indicate broader fits. Some brands use numbers or descriptors (narrow, regular, wide) instead.
Measure width across the ball of your foot while standing, because weight spreads the foot. If toes feel cramped or the shoe slips at the heel, the width is wrong. Proper width prevents blisters, bunions, and long-term pain. If you buy online, check the brand’s width chart and read reviews about fit before ordering.
How to Measure Your Foot Correctly
You will learn the exact tools to use, the step-by-step method to measure length and width, the best time to measure, and the common mistakes that make sizes wrong.
Materials Needed for Measuring
Gather a piece of paper larger than your foot, a pencil, a ruler or tape measure, and a hard flat surface. Use a straight ruler for length and a flexible tape for width if you have one. A chair helps you balance while standing.
Wear the socks you plan to use with the shoes. Use the same socks when trying on shoes later to keep measurements consistent. If you have two different feet sizes, always measure both and use the larger measurement.
Keep a pen to mark the longest toe and the back of your heel. A second person helps get more accurate tracings, but you can do it alone by leaning on a wall. Record measurements in inches and centimeters for comparison with different size charts.
Step-by-Step Foot Measurement Process
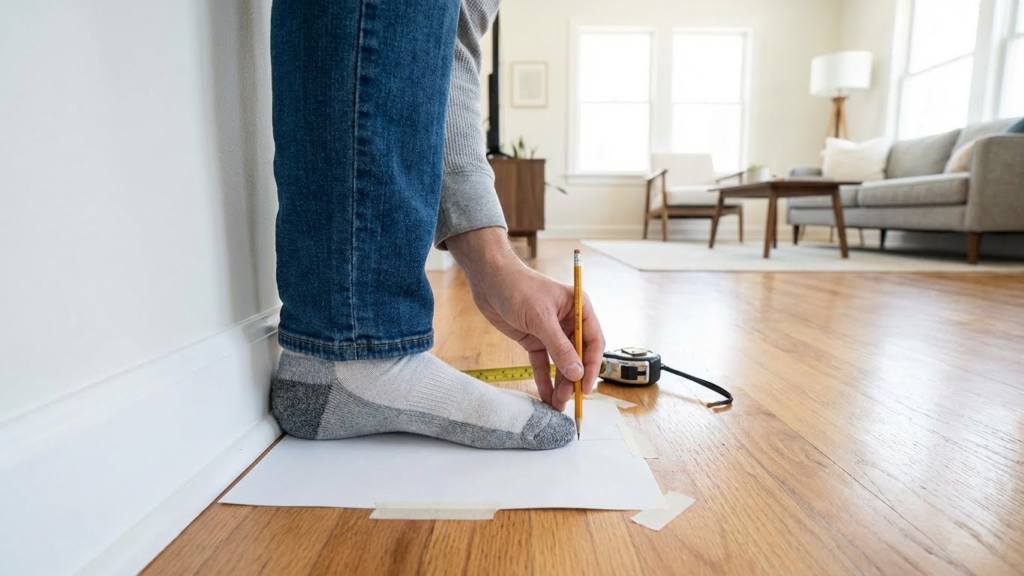
Place the paper on the floor against a wall. Stand with your heel lightly touching the wall so your foot is flat and weight-bearing.
Trace your foot with the pencil held vertical. Mark the tip of the longest toe and the back of the heel. Measure from the heel mark to the longest toe mark for foot length.
Measure width at the widest part across the ball of your foot. Use the ruler or tape measure and write both length and width. Compare both numbers to the shoe brand’s size chart, and pick the size that matches your larger foot if they differ.
Best Time of Day to Measure
Measure your feet in the late afternoon or evening when your feet are slightly larger from daily activity. Feet swell a bit throughout the day, and shoes fit differently if measured in the morning.
If you plan to wear the shoes for standing or long walks, measure after similar activity if possible. For children, measure at the end of an active day; for adults who stand all day, measure after a typical workday.
Re-measure every six months for growing children and yearly for adults, or whenever your weight or activity level changes significantly. Keep a record of past measurements to notice gradual changes.
Common Measurement Mistakes to Avoid
Do not measure while sitting; standing applies your full weight and shows true shoe needs. Avoid tracing with a tilted pencil—hold it straight to get accurate outlines.
Don’t rely on memory of size or only one foot’s measurement. Many people have one foot larger than the other. Measure both feet and use the larger measurement when choosing a size.
Avoid using soft or stretched paper that deforms under pressure. Also avoid measuring in bare feet if you plan to wear thick socks; use the sock thickness you’ll wear with the shoes. Finally, always cross-check your measurements with the specific brand’s size chart before buying.
Converting Shoe Sizes
You will learn how major sizing systems match up and how to handle half sizes and wide fits. The goal is to help you pick the correct size when buying from different countries or brands.
US, UK, EU, and Other Major Sizing Systems
Different countries use different scales. US sizes use whole and half numbers (e.g., men’s 9.5). UK sizes are typically about one size smaller than US for adults (men’s UK 8 ≈ US 9). EU sizes use a numeric system based on foot length in Paris points (e.g., EU 42). Japan and Korea use centimeters directly, so a 26.5 cm foot often equals JP 26.5.
Use a conversion chart or table when switching systems. Note that men’s and women’s sizes differ—women’s US sizes are about 1.5–2 sizes higher than men’s. Always check the brand’s size chart because manufacturers vary.
Conversion for Half Sizes and Wide Fits
Half sizes add about 1/6 to 1/3 inch (4–8 mm) of length. If you wear a US 9 and footwear is only in whole sizes, try US 9 or 9.5 depending on toe room and sock thickness. For width, letters indicate fit: B is standard for women, D for men. Wider fits like EE or EEE add extra width but not always length.
When converting, measure your foot in centimeters and compare to the shoe’s internal length. If between sizes, choose the larger size for athletic shoes or thicker socks. For dress shoes, consider professional fitting or brand-specific notes on narrow or wide lasts.
Finding the Perfect Fit
You need shoes that match your measured length and width, feel stable when you walk, and leave a little room for toe movement. Focus on fit at the heel, midfoot, and toe box to avoid pressure points and slipping.
Trying Shoes at Home
Try shoes later in the day when your feet are slightly swollen. Wear the socks you plan to use with the shoes. Stand and walk for several minutes on a hard surface to check real-world fit.
Check heel fit first: your heel should not slip more than a quarter inch when you walk. Then assess the midfoot: the arch and laces should hold your foot without pinching. Finally, test the toe box: you should have about a thumb’s width (roughly 1–1.5 cm) of space from longest toe to shoe tip.
Use this quick checklist while trying shoes:
- Stand flat and press down on the insole to feel support.
- Walk on different surfaces to detect rubbing.
- Try both shoes; feet can be different sizes.
Identifying Signs of Good Fit
A good fit feels secure, not tight. Your toes should lie flat and have vertical and horizontal room. You should not feel numbness, tingling, or sharp pressure anywhere.
Look for even pressure across the foot when standing. The shoe should hold your heel without excessive movement and the midfoot should not bulge. When you walk, your foot should not slide forward—repeated forward movement causes blisters at the toes.
Check fit with simple tests:
- Push the shoe forward; your toes should not hit the front.
- Loosen and retie laces to remove pressure points.
- After a short walk, inspect for red spots or hot spots that signal poor fit.
Tips for Shopping Online
Measure both feet and use the larger foot’s measurement for size choice. Compare your length and width to the brand’s size chart, not just the size number. Brands vary widely, so always check the brand-specific chart.
Read recent customer reviews about fit and width. Look for comments on whether the shoe runs long, narrow, or true to size. Choose retailers with easy return policies and free returns if possible.
When ordering:
- Add half a size if you fall between sizes and plan to wear thicker socks.
- Note the shoe’s last (narrow, regular, wide) if listed.
- Keep the original packaging until you confirm fit, so returns remain simple.
Special Considerations for Specific Foot Types
You need to match shoe features to your foot shape to avoid pain and improve comfort. Focus on arch support, width fit, and correct sizing for growing feet.
High Arches or Flat Feet
If you have high arches, choose shoes with strong arch support and good shock absorption. Look for cushioned midsoles, contoured footbeds, and a slightly flexible sole to spread pressure evenly. Avoid completely flat insoles; instead use removable orthotic inserts if factory support is weak.
If you have flat feet, pick shoes with firm medial support and a stable heel counter. Motion-control or stability shoes help prevent overpronation. A removable insole lets you add a custom orthotic if you need more arch correction.
Measure both feet while standing. Compare length and width against the shoe’s internal dimensions. If one foot differs, fit to the larger foot.
Wide or Narrow Feet
For wide feet, seek brands that offer wide (W) or extra-wide (EE) options. Choose rounder toe boxes and softer upper materials like mesh or leather that stretch. Avoid narrow, pointed styles that squeeze the forefoot and cause bunions or blisters.
For narrow feet, use shoes with narrower lasts or add thin insoles and heel grips to prevent slipping. Lace-up designs let you tighten the midfoot for a secure fit. Try sizes half a step down only if length still fits correctly.
Always try shoes later in the day when feet are slightly swollen. Walk at least 10 minutes to check for hot spots and proper heel hold.
Growing Children’s Feet
Measure children’s feet every 2–3 months for toddlers and every 3–4 months for older kids. Allow about 0.5–1 cm (roughly a thumb’s width) of extra length for toe growth and movement. Too-tight shoes can harm foot development.
Choose flexible soles and supportive heels. Avoid hand-measuring with old shoes; use a ruler or a printable sizing chart and measure with the child standing. Check width as well — many kids need wider toe boxes as they grow.
Replace shoes when you see pinching, slippage, or uneven wear. Keep receipts and test indoors first if you buy online.
Shoe Size Measurement Tools
You need the right tools to get accurate length and width. Choose between a Brannock Device for in-store precision or a printable chart you can use at home.
Brannock Device
A Brannock Device measures both foot length and width precisely. You place your heel against the back, slide the movable pointer to your longest toe, and read the length in US, UK, or EU sizes. Use the width slider under the foot to check narrow, medium, wide, or extra-wide fittings.
Ask for help if you can’t stand evenly. Measure both feet while wearing the socks you plan to wear with the shoes. Read measurements with weight on the foot; that gives the truest fit because your foot spreads when you stand.
Printable Measuring Charts
Printable charts let you measure at home using paper, a pen, and a ruler. Trace your foot on the paper while standing, mark the heel and longest toe, and measure the distance with a ruler or tape in inches or centimeters.
Make sure the PDF prints at 100% scale. Use these quick steps: (1) place paper on a hard floor, (2) wear the socks you’ll use with the shoes, (3) stand straight while tracing, and (4) compare your measurement to the brand’s size chart. If you need width, draw a rectangle around the tracing and measure the widest part.
Caring for Your Feet After Measuring
Keep your feet clean, checked for signs of pain or swelling, and tracked for size changes. Follow simple steps to ease any discomfort and note when your feet grow or widen so shoes fit right.
Addressing Discomfort or Irregularities
If you feel pain after measuring, first check the area you marked. Red marks from tracing usually fade in a few hours; persistent redness, sharp pain, numbness, or blisters need attention.
For mild soreness, soak your feet in warm water for 10–15 minutes, then gently massage the arch and ball of the foot. Apply an ice pack for 10 minutes if you see swelling. Use over-the-counter cushioned insoles or heel pads to reduce pressure while you test shoe fit.
If the problem is a visible irregularity — bunion, hammertoe, or a high arch — avoid forcing a too-tight shoe. Try wider widths and shoes with removable insoles. See a podiatrist if pain lasts more than a week, walking changes your gait, or you have a health condition like diabetes.
Monitoring Foot Size Changes Over Time
Measure your feet every six months, or sooner if you notice tightness. Do this at the end of the day, wearing the socks you plan to use with the shoes, and stand while tracing for the most accurate length and width. Record length and width in both inches and centimeters so you can compare later.
Keep a simple log with date, measurements, shoe model and size that fit best. Note life changes that affect feet: weight gain or loss, pregnancy, new exercise routines, or aging. If one foot is consistently larger, buy shoes for the larger foot and fit both; use custom orthotics if sizes differ significantly.
Conclusion
You now know how to measure your feet at home and why accurate sizing matters. Measure both feet, use the larger measurement, and check length and width before you buy.
Keep a simple kit: a piece of paper, a ruler, and a pen. Measure standing, in socks you plan to wear, and test shoes later in the day for best fit.
Remember brand and style can change fit. Always consult the brand’s size chart and read return policies when shopping online.
Quick checklist:
- Measure both feet while standing.
- Use the larger foot measurement.
- Compare to the brand’s size chart.
- Try shoes on with the socks you’ll wear.
If a pair feels tight at the toe or pinches the sides, it’s likely the wrong size. Aim for about a thumb’s width of space at the longest toe for comfort.
Keeping measurements and notes for each brand saves time and reduces returns. That simple habit helps you find comfortable shoes faster and protects your feet over time.